Discord Help
Unofficial support and solutions with Discord user account & server management, community programs, and best practices.
This is not official support. If you need help with your account, open a ticket via dis.gd/support.

Full rules here.
- Follow the Lemmy.World rules
- No NSFW Content
- No Advertising / Self-Promoting.
- No memes, low effort rants and other off-topic content
- For bot help contact their support page or server directly.

Community Basics
- [Server Structure]
- [Roles & Permissions]
- [Finding Moderators]
- [Enabling Community]
- [Onboarding]
Intermediate Guides
- Formatting 101
- Automation and Bot Recommendations
- Emoji, Stickers, & Sounds
- Moderator Tools & Guidelines
Advanced Guides
- Accessibility
- Server Boosting
- Discovery, Verification, & Partnership
- Server Web Page
- Templates and Resources

This community is for unofficial support and solutions with Discord server management, community programs, and best practices.
To get you started, you can find guides for setting up your Discord server or get the most out of your existing server. Focusing on community features, bot recommendations, social media integration guides, formatting tricks, guidelines for moderators and accessibility tips, you should have everything you need as a server owner to kickstart a vibrant and healthy Discord community.
This is not official support. If you need help with your account, open a ticket via dis.gd/support.

- Follow the Lemmy.World rules
- See Lemmy.World.
- No NSFW Content
- Keep it safe for work.
- No Advertising / Self-Promoting
- No asking for or providing links to Discord servers. You can promote & find servers in !discord_communities, or find communities via discord.com/servers.
- Posting Standards
- This is a place to ask questions and get help troubleshooting issues or share information related to Discord settings, server configuration and running communities. Memes, low effort rants and other off-topic content will be removed.
- Bot Help
- If you need help with bot settings or commands, contact their support page or server directly.

(this section will be filled as I convert my guides to Lemmy formatting)
Community Basics
This section covers everything regarding a basic server setup in a chronological order.
- [Server Structure] (coming soon)
- [Roles & Permissions] (coming soon)
- [Finding Moderators] (coming soon)
- [Enabling Community] (coming soon)
- [Onboarding] (coming soon)
Intermediate Guides
This section covers how to get the most out of formatting, expressions, bots and moderators.
- Formatting 101
- Automation & Bot Recommendations
- Emoji, Stickers, & Sounds
- Moderator Tools & Guidelines
Advanced Guides
This section covers accessibility strategies, monetization, marketing, and external resources.

This is the third intermediate guide posted to cover Expressions: emoji, stickers and sounds. Find all the available guides here.
Emoji, Stickers and Sounds
Expressions like emoji and stickers add some personalization to spruce up your server and make it recognizable. In this section, we're going to cover the following all the different types and what is viable for each one.
Emoji
Emoji create a visual element that is tailored to your server and helps your members link your product or brand to emotions. People that have Discord Nitro can also use the emoji of your server in other servers, which can be seen as free advertisement! Initially, there's space for 50 emoji and animoji per server, which can be expanded upon with Server Boosts.
- File type: JPEG, PNG, or GIF
- File size: <256 KB (anything bigger will be compressed)
- Dimensions: 128x128
What makes a good emoji?
The key is to use emoji that can be used as reactions or intent. A game character or logo is not the best option because of the small resolution and lack of focus. Emoji are used as a reaction, so facial expressions of characters, faction emblems and even art from the brand or product that could replace existing emoji are all excellent choices. Use your own emoji regularly when pushing announcements and news to further solidify the expressions they represent.
💡 Tip
Uploading any emoji will make them available for other members on the server, too. This isn't necessarily problematic, but if you have Discord Nitro you could upload them on your private server for your use only.
Starter pack
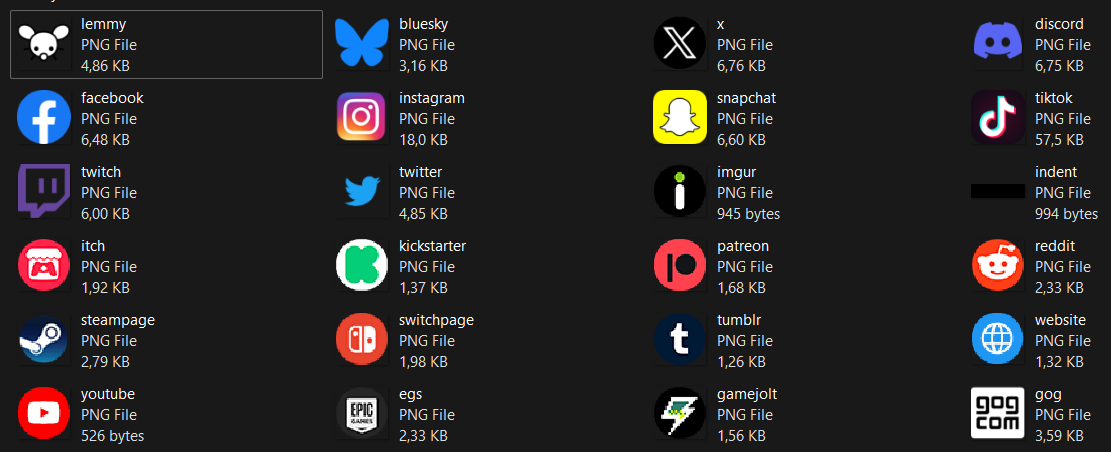
I have created an emoji starter pack to help you visualize the various platforms you can link in your posts. Check out the details here or download it directly here.

Stickers
Stickers are basically very large (animated) emoji, allowing it to be way more expressive than emoji. Think of key characters or memes that don’t fit in an emoji, but can be used as a sticker reaction. Initially, there's space for 5 stickers, which can be expanded upon with Server Boosts.
- File type: PNG or APNG
- File size: <512KB
- Dimensions: 320x320
- Matching unicode emoji
What makes a good sticker?
Once again, stickers should be used as reactions and need to invoke some emotion. Just like emoji, facial expressions and animations are the best options here. Because of the bigger canvas size, you can fit a lot more detail in so top body shots are also feasible now. Use the stickers regularly when having conversations to further solidify the expressions they represent. Don't forget to add a description text as well for those using a screen reader.
Sounds
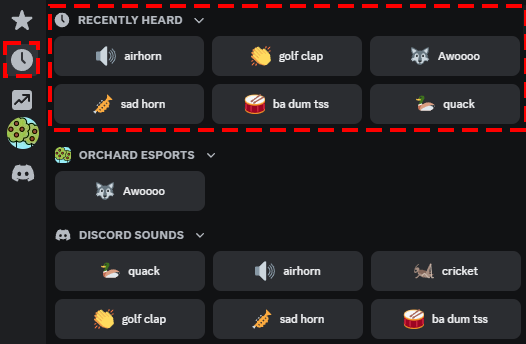
Sounds can be uploaded to the Soundboard to be able to play them when chatting in a voice channel. There’s a few default sounds that are already enabled that could provide some entertainment during a voice call.
- File type: MP3
- File size: <512KB
- Length: up to 5 seconds
What makes a good sound?
What kind of sounds you will upload is heavily dependent on what kind of voice activity you’re going to be having in the server. Personally, I think it could add a lot of noise when abused, so try to use sounds sparingly.
This is the fifth advanced guide posted to cover some external resources and templates to support you with managing your Discord server. Find all available guides here.
Templates and Resources
Discord server template
This is a link to generate an entire server with the channels, roles, permissions and moderation settings (except for 2FA) already configured. Be sure to read the channel topics for more guidance on how to fully deploy the template to a public server. You can also use this template as a visual guide. If you use the template, don't forget to change the channel topics after you're done.

Template link (this will take you in-app and show the server before creating)
Emoji starter pack for various platforms
If you like emoji to go with links and platforms in your messages, this archive of emoji covers all major platforms. Feel free to add suggestions to this pack. This is what the .zip looks like (.PNGs):
Spreadsheets
Social Media Integrations
This spreadsheet hosts guides on how to integrate various (social) platforms like Twitter/X, Facebook, a website/blog, Instagram, YouTube, Reddit, Steam News and/or Twitch on your Discord server at no cost other than time, a bit of work and a free account with a website called IFTTT (If This, Then That). Here's the link to the sheet.
Event Workflow
This spreadsheet provides a place for you to place links and text to be able to generate recurring events in a more streamlined way. Feel free to generate a copy of the workflow template.
This is the fourth advanced guide posted to cover the Server Discovery add-on of a web page for your Discord server. Find all available guides here.
Server Web Page
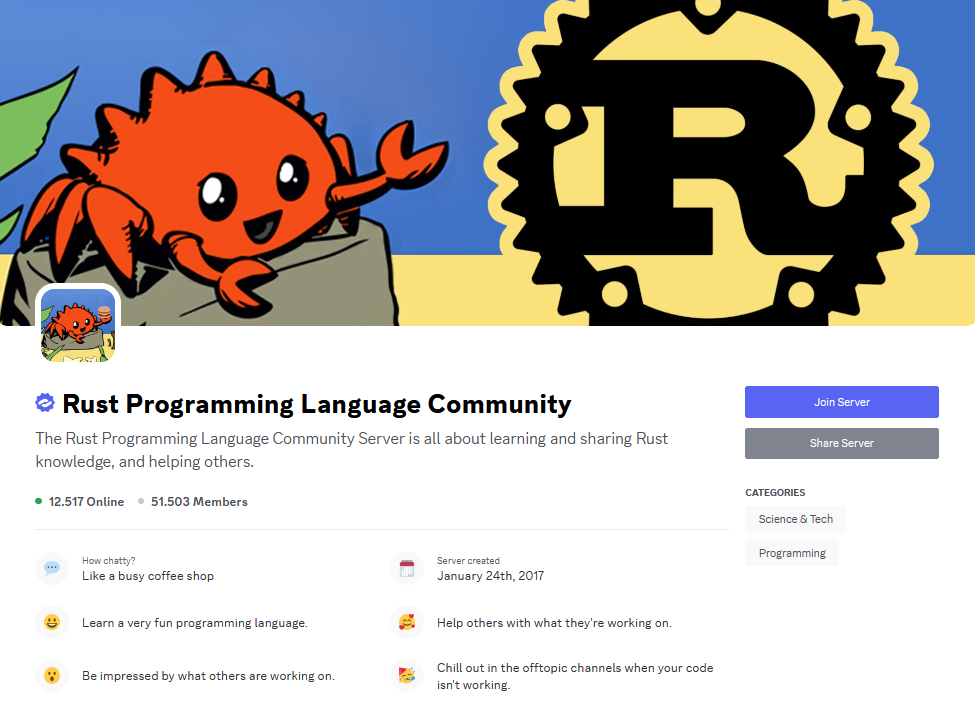
A Server Web Page is a page on the Server Discovery listing that you can set up to inform and attract potential community members. This index has been available through the in-app browser for a while, but with a web page you can reach new community members that are browsing the web.
⚠️Warning
Web pages is a feature in beta and only available to a small set of discoverable servers. If you have Discovery enabled without this web page, your server will still show up on the in-app server browser.
Why you want a Server Web Page
As the content of Discord servers are not indexed by search engines, you could only depend on third party platforms to host the information that would make your server appear to your potential audience. With a dedicated web page hosted on discord.com/servers, you can describe your server accurately and specifically to help new members find your server when they’re searching the web for relevant terms.
Mirroring Server Discovery, you will be shown the category and assigned subcategories that you have configured previously that allows users to find your server with the in-app browser. The Discovery cover image is used here as well. Other assets that transfer over are the server icon and the server description from the Community settings.
Highlighting Activities
The core distinction from the Discovery Listing is that the Server Web Page allows you to list up to four reasons for why users should join the server in the form of a short description and a connected emoji. Recommended key topics on this list should be clear on how it provides value to new members that are looking for a server to join. If your server is about a brand or product, you can highlight what users can expect in terms of official events, official support and how to connect to other users.

The highlighted activities will be listed under the chatting status and server age information accompanied by the 💬 and 📅 respectively, so don't use those emoji to avoid repetition.
In-depth Description & Social Links
Next to activities, you can also add a description and links to other social media. With the description you can go more in-depth about your community as to what potential members need to know and why they should join the server. With room for 2400 characters, there’s plenty of space to highlight what’s great about the community and what features you facilitate on the server. Bear in mind there’s no text markup or hyperlinks available, so keep it simple.
Lastly, you can link up to 9 social media accounts to showcase on the web page. This is highly recommended provided you have the accounts, as it solidifies your position on the web, like allowing users to verify the official status of your server.
Let's see if those ampersands in titles are fixed on Lemmy.world!
Short guide this time: this is the third advanced guide posted to cover the official community programs called (server) Discovery, Verification and Partnership. Find all available guides here. For any Discord server community program your server will need to meet Discord's Community Guidelines. If you’ve been following my guide in [coming soon], you should have most of it covered already.
Server Discovery
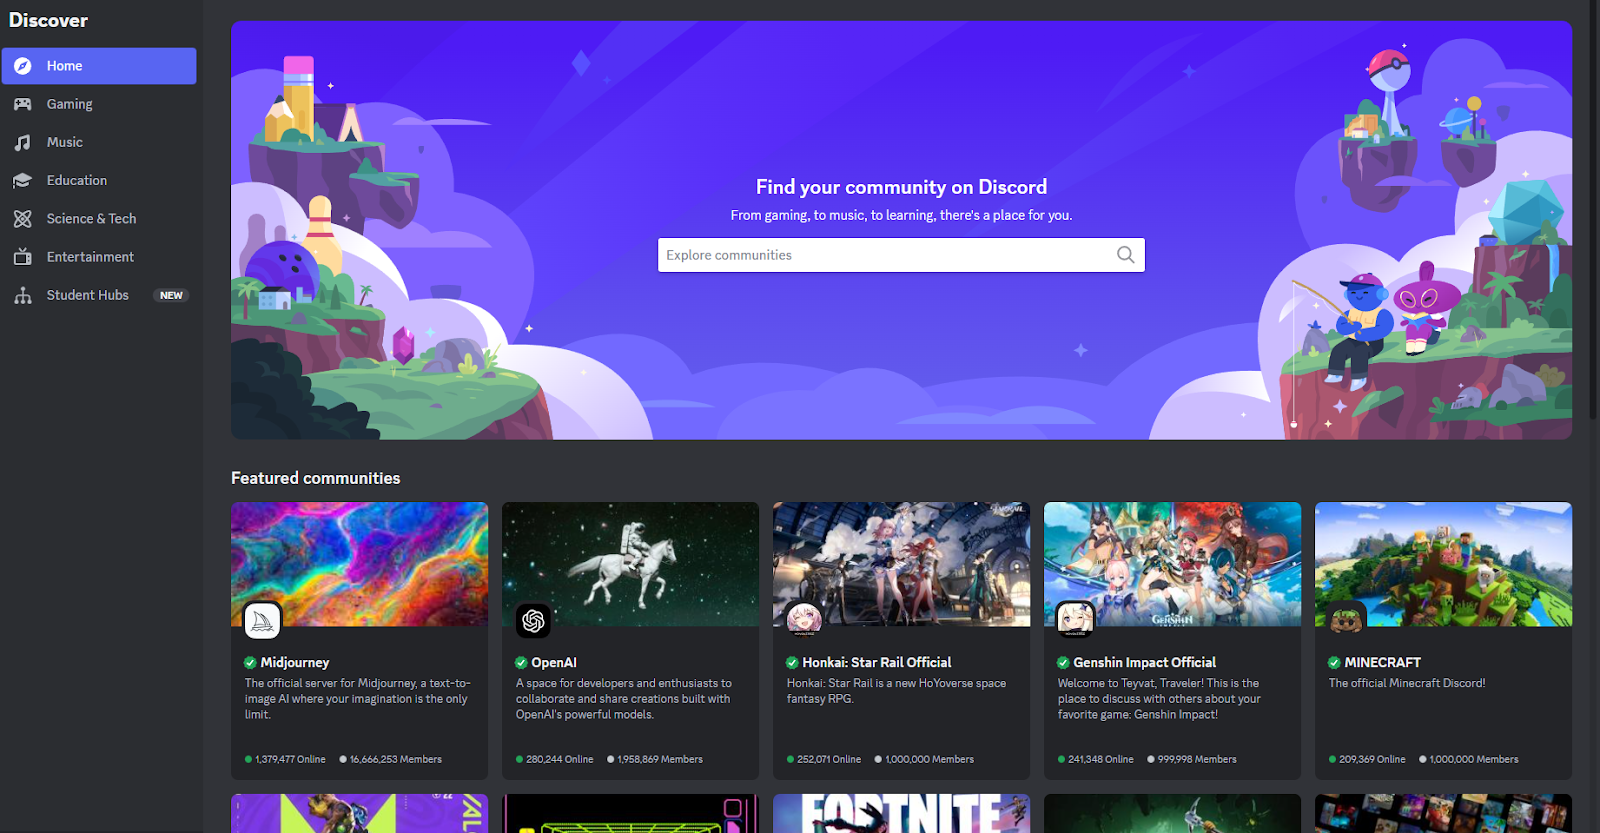
Server Discovery is a search tool for users to find new compatible communities with ease. Via discord.com/servers or the in-app server browser, users can filter by categories or use the search bar to find communities they might be interested in. Your community can be one of these if certain conditions are met.

How Discovery benefits you
The Server Discovery listing increases the reach of your server as anyone can browse communities and find servers that fit. With the so-called "Lurker Mode", users can view your server to figure out if it's worth it to join before actually being a part of your server.
Server Discovery is a standalone feature for Community servers that can be enabled without your server having to be Verified or Partnered. Having either of these community features will make enabling Server Discovery much easier though, as you only need half of the size requirement.
Requirements
You can check the full list of targets you need to hit in the Discovery settings of your server, but here’s a few we haven’t talked about yet:
- Age: The server needs to be at least 8 weeks old;
- Activity: The server must have more than 20 members talking (communicators) weekly and more than 40 members visiting weekly (participators). For servers that have more than 10 new people joining weekly, you also need to have new member retention be above 10%;
- Size: Discovery is available to servers with more than 1,000 members. When the server is Verified or Partnered you only need 500.
Implementing Discovery
Aside from having a public server and telling your fans where to find it, listing your server in Server Discovery can be a great way to grow your server. In the server settings, you can assign a category and up to 5 subcategories to help potential members find your server more easily. Make sure to set a subcategory even if it means using the same as the main category to not get hidden by the filters users can set.
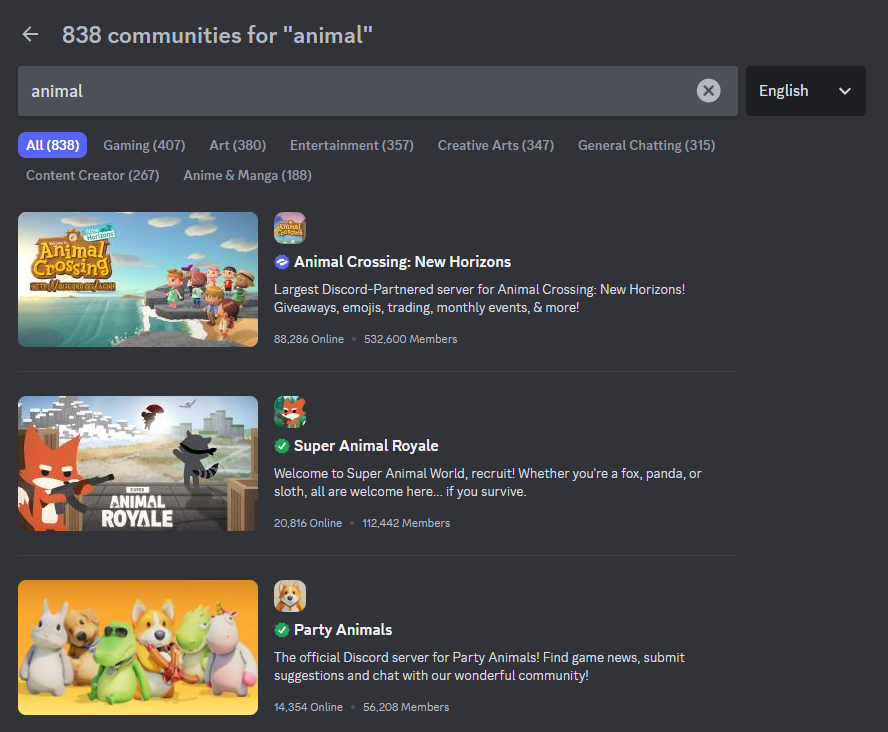
With room for up to 10 keywords you can further tweak your discoverability by putting in keywords that are related to your community. To stand out in the search results to users, you can add a general description, a custom cover image and opt for showing the top 5 emoji of the server.
Losing privileges
If your server doesn't hit the requirements for 4 weeks in a row, it can be removed from the Discovery listing. You won’t be penalized for abusive behavior though - bots and users who join and leave immediately are not counted towards your server’s stats.
Server Verification & Partnership
⚠️ Server Verification is currently paused, and Discord has not provided any ETA. Server Partnership has been retired. More content will be added depending on future endeavors of Discord.
This is the second advanced guide posted to cover the viability and use of Server Boosts. Find all available guides here.
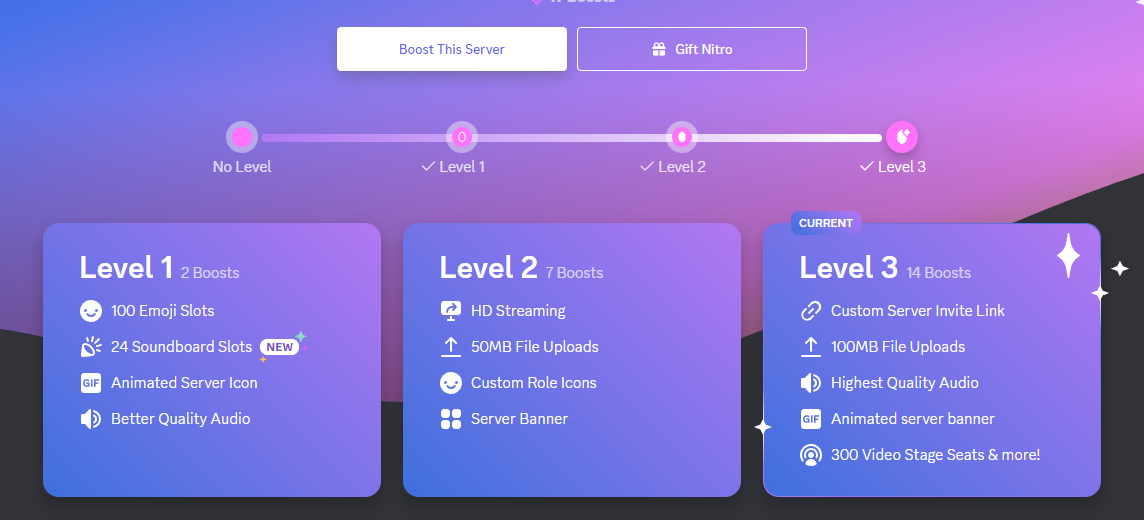
Server Boosts are perks that can be purchased via recurring monthly payments. If you’re a Nitro subscriber, you will get 2 Server Boosts included with your subscription to kickstart a server. In this section I will list all the perks that can be unlocked and how to deploy them to your server. Every level also includes more slots for emoji, stickers and sounds.
Boost level 1
Boost level 1 is the most feasible level to achieve as there are only 2 boosts needed. If you are a Nitro user, you could boost your own server with the two that came with the subscription, or buy two more at a discounted rate. After your server reaches level 1, you will get a few perks to get your server looking more lively.
Animated Server Icon
An animated server icon is a nice visual element that can make you stand out from other servers. If you have the means to animate or otherwise acquire an animation of your server’s icon it would be good to make use of it. It gives the server a bit of liveliness and it might generate some discussions on the server.
You can change the server icon in the general Server Settings window. Bear in mind it still needs to be under 8MB, just like a regular server icon.
Server Invite Background
The server invite background is what users see after clicking a discord invite link, right before they press the button to join the server. It’s recommended to re-use some art or a logo to accompany the invite link, as a separate art piece just for this part is a bit of a waste.

You can change the server invite background in the general Server Settings window. The recommended minimum size is 1920x1080 (16:9). Try to avoid using the top and bottom edges as the browser UI might hide some elements. The invite embed, invite in browser and invite confirmation modal will be overlaid in the centre, so try to work around that too.
Audio + Stream Quality
Additionally to visual perks, you also unlock 128 kbps audio quality (from 96) and 60 fps streaming at 720p (from 30 fps). Upping the audio quality of official events in voice channels is not a bad idea, but bear in mind users with a less stable connection might have more difficulties connecting. Find the audio quality in the voice channel settings and the video quality settings when you’re streaming.
Boost level 2
Boost level 2 requires 7 boosts and is harder to pull off individually. Usually this level of boosting is acquired when your server has grown substantially and community members pitch in with a boost or two. After your server reaches level 2, you will get a few visual perks as well as practical ones.
Server Banner
The server banner background is a neat little picture right at the top of the channel listing of the server to help identify the community. It also provides a nice visual element that can go well together with your server icon and the rest of the art on the server.
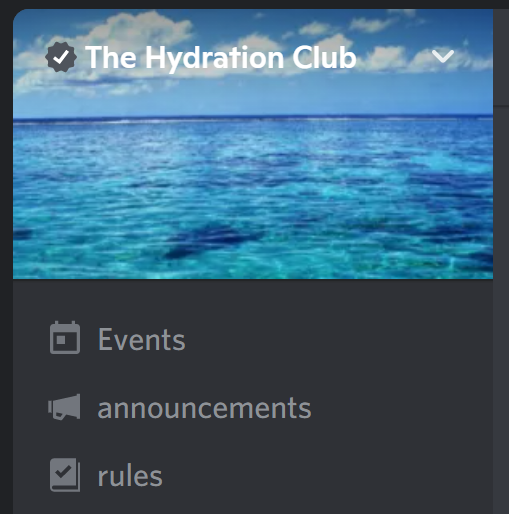
You can change the server banner background in the general Server Settings window. The recommended minimum size is 960x540 (16:9). Try using a nice big logo or simple art piece to showcase on the server. Text is fine but no more than a full sentence as otherwise it would be too small to read.
Custom Role Icons
With custom role icons, you can set an icon for every role within the server. Think of these as an extension of role colours. Role icons will display in the members list next to the role name, and next to each user's name in chat. You can see all roles and icons that a user has in their user profile from within the server as well.
You can find the role icon settings in the Roles settings of the server. Select a role and under the “Display” tab you will find a field called “Role Icon”. You can use emoji or upload any image of your choice. If you have roles tied to a team or some prestige status, it’s highly recommended to give them a cool badge to go with their role, too.
Upload Limit
Together with the new visual elements, all users also have an increased upload limit of 50MB (from 25MB). Nitro users aren’t affected by this as they have 500MB by default. This allows users to share video attachments and high resolution art more easily without having to worry about reducing the quality.
Audio + Stream Quality
Once again, you also unlock 256 kbps audio quality (from 128) and 60 fps streaming at 1080p (from 720p). This level of audio quality should be reserved for podcasts and any other type of content that is meant to be shared or exported later. Find the audio quality in the voice channel settings and the video quality settings when you’re streaming.
Video Stage Seats
For Stage channel events where video is shared, you can now have up to 150 viewers (from 50) to share your event with. This is generally reserved for interviews, podcasts, or fireside chat-style conversations.
Boost level 3
Boost level 3 requires 14 boosts and is the maximum levels of boost you can acquire. This level of boosting is generally achieved when users find that the server has a lot of value and they want to give back to the community. After your server reaches level 3, you will get the much wanted custom invite link and an animated server banner, as well as some other practical benefits.
Custom Invite Link
Unless your server is currently Verified or Partnered, the only way to acquire a custom invite link is through boost level 3. This might be steep, but it’s definitely worth it to try and unlock this feature. A custom invite link will add a ton of credibility to your server as it’s not a random string of numbers and letters. Find it under Custom Invite Link in the server settings.

Upload Limit
Once more, the upload limit of all members is increased. Now users will be able to upload files of 100MB (from 50MB), which is mostly useful for video attachments. Generally not having to worry about any file size limit is a nice perk for server members.
Animated Server Banner
An animated server banner will help the server stand out visually.. If you have the means to animate or otherwise acquire an animation of your server’s banner background it would be good to make use of it. It gives the server a bit of liveliness and it might generate some discussions on the server.
Audio Quality
The maximum audio quality is upped one more time to 384 kbps audio quality (from 256). This seems a bit over the top and aside from recording music over discord I’m not sure what to use it for.
Video Stage Seats
Lastly, the amount of Stage channel in increased to 300 viewers (from 150) to share your event with. This is generally reserved for interviews, podcasts, or fireside chat-style conversations.
Is it worth it?
While server boosts are an excellent way to provide shortcuts to features of Discord, maintaining the maximum levels of boosts will probably not be worth the investment as you’re looking at hundreds of dollar per year. While this seems quite extortionate, keep in mind Boosts are meant for individual community members to show support to a server. Try to focus on making the server as valuable as possible to your community so they feel like they want to give back.
This is the second intermediate guide posted to cover all things bots and automation. Find all the available guides here.
Discord bots are helpful bot users that can assist you with managing your server or providing some sort of service. In this section I will mainly talk about three different categories of bots:
- Server setup essentials
- Community tools
- Entertainment
Disclaimer: I am not affiliated with the Discord bot( developer)s listed below. This guide covers my opinions and experiences with various bot features and aims to provide accessible options for popular automation needs.
Server setup essentials
My personal recommendation when it comes to setting up your server is Dyno. The provided dashboard makes setting up different modules a lot easier and everything listed as an essential server feature in this guide is free to use with Dyno.
Logging
For any type of logging, it's the most accessible when it's easy to configure and a clear visual style. Dyno covers both these requirements and has proven to be reliable. With a toggle in the dashboard for each event you can customize what you see and in which channel you see the log type. Most importantly, the User ID of the user involved is shown on almost all log messages making it much easier to track down specific accounts. More info about that in the Moderator Tools guide.
Welcome message
The welcome message is a post by the bot whenever a new user joins, preferably in an introductions channel. Next to an actual welcome you can also use this space to provide some onboarding like how to get roles, read up on official info as well as inviting them to introduce themselves.
💡 Tip
The welcome message is but a small cog in the onboarding chain and will assist in providing new users with a smoother experience. This does not replace a human welcome: the best onboarding you can get as a new member is to be enthusiastically greeted by the community!
Custom commands
The bot can reply with a predetermined message whenever a custom command or keyword is posted. Helpful to quickly retrieve links or information that is often referred to, like a release date, wiki site or the support link.
Community Tools
Aside from bots that help with creating your server, you can also get bots that serve the purpose of enriching the user experience of your community server. Highlighting streamers and content creators, collecting data about server activity, providing bug reporting tools, automating voice channel creation: there are many different types of utility you can use to automate processes and dedicate a space to a special group.
Starboard
The starboard is like a highlight reel of the community. Users can vote on messages they like with a predetermined emoji, and if the emoji reaction hits a predetermined amount the bot will embed the post in a separate channel. Use a custom emoji to further personalize this and you’ve got your own community Hall of Fame.
Giveaways
For giveaways, Giveawaybot is an excellent choice as it is easy to setup and allows users to partake in the randomly drawn winners by clicking on an emoji reaction. Giveaway Boat is also a good contender.
Highlighting livestreams & videos
Highlighting Twitch livestreams is easily done with Streamcord. You can set up to 25 streamers to announce when they go live, and add users to a "now live" role if you want to highlight them on your server.
If you want to get more advanced control of Twitch and YouTube content, a reliable bot is Couchbot but it comes at a premium for $1 a month. At this tier, you get 5 content creators on each platform for 2 servers. Starting at $3 a month, you can even filter by games or teams, allowing you to not only push your own live streams automatically, but also post streamers playing certain games (like yours!). The setup can be a bit rough with toggle commands only though, so be sure to follow the documentation.
Social media feeds
Posting social media feeds comes in two flavors: webhooks and bots. Websites that host free webhook options like IFTTT and Zapier allow you to push a platform to a Discord channel, but this requires creating an account and only allows a limited amount of connections. Setting up content like tweets to be posted through a webhook is relatively easy though, and - as far as I know - the only true free option.
As for bots, the amount of connections varies and the speed of live notifications can vary as well, just like webhooks can be rate limited. You can stick to Dyno for Twitch and YouTube or try YAGPDB, but social media, Steam and websites are best to use with an RSS bot like MonitoRSS. You can set up 5 blog posts, news feeds or social media feeds for free with 15 minute intervals, provided you have a working RSS link.
💡 Tip
If you need some guidance with setting up a webhook to push Tweets/X’s, or want to integrate Facebook, Instagram, Reddit, Twitch, YouTube, Steam, a website/blog and/or RSS feeds, try my Social Media integrations guide for Discord.
Collecting data
Statbot is a bot that snoops around your server to collect data about your server activity. With statistics about messages, users and voice activity, it paints a good picture of who is most active in your server and what the high-traffic channels are. You can even assign roles based on the stats automatically if you want to reward active users on your server with a special role, and control what channels are exempt from collecting data. When you reach 500 members, you can use Discord's official Server Insights to view more data about your server.
Entertainment
Last but not least, there is quite an amount of bots that provide games to play, economies to partake in and leaderboards to climb. I've only picked a few out of the massive list available, so if you have any recommendations for bots that really stand out compared to the rest, let me know!
Economy
While there are many bots that provide some sort of economy, Unbelievaboat is the only one I’ve seen implemented well. With personalized items, dialogues and the currency you get a lot of creative freedom to tailor the bot to the universe of your game or brand. These types of bots can be useful when project development is slow as your community can engage and interact with your content and universe in a different way.
Leaderboards
ActivityRank assigns users XP based on messages, voice minutes, “upvotes” and/or referrals. By being able to toggle any category, exclude any channel and assign any roles to the rankings you set, the only thing missing is a dashboard to configure the bot with more ease.
What happened to...?
- Auto-moderation? Now natively supported: Automod FAQ
- Text Chat for Voice Users? Now natively supported: Text Chat in Voice Channels
- Reaction roles? Now natively supported as part of the Onboarding feature. A separate Channels & Roles channel appears that allows users to assign roles and channels: Onboarding FAQ

This is the first intermediate guide posted to cover all things formatting. Find all the available guides here.
Formatting 101
In this guide you will find tips and tricks regarding formatting to take full advantage of how Discord parses text, embeds and pings. Use these features to your advantage when writing resources, official announcements and other news. For a full overview, check out Markdown Text 101.
Formatting basics
There are a few native options available that will help you format your text. Let's dive in straight away:
Header large (# Header large)
Header medium (## Header medium)
Header small (### Header small)
The headers are a more recent addition and great for any read-only channel that is meant to be read carefully. You can also include headers in announcements if you have a lot of news to cover.
- List (
* List)- Indented list (
* Indented list)
- Indented list (
Alternatively, you can use - instead of * . Lists were also recently added and it provides the ability to create bulleted lists with one level of indentation. Great for patch notes, rules and any other summaries.
- Italics
*Italics*(or_Italics_) - Bold
**Bold** - Bold italics
***Bold italics***(alternative:_**bold italics**_) - Underline
__Underline__(doesn't seem to be supported by Lemmy)
Additionally, you can combine them like __*underline italics*__, __**underline bold**__ & __***underline bold italics***__. While they should be used sparingly, it can help emphasise certain elements of your text.
Quote
> Quote(use one>for each line break. If the quote is at the end of your message, you can use three to makeall following text quoted text (>>>).
Code blocks (`Code blocks`) will prevent formatting, as you might have noticed in these guides.
If you want to do multiple lines in a single block, use three `'s at the start and end of the sentence like Multi-line code blocks (```Multi-line code blocks```). This creates a box filling the entire width of the chat window.
Timestamps
Timestamps can be used in Discord messages to include a date or time relative to the user's timezone and regional settings. These timestamps are Unix Timestamps and are formatted like <t:1698591600:f>. Unless you know exactly how many seconds have passed since January 1st 1970, it’s best to use an online tool like this one to generate your timestamps.
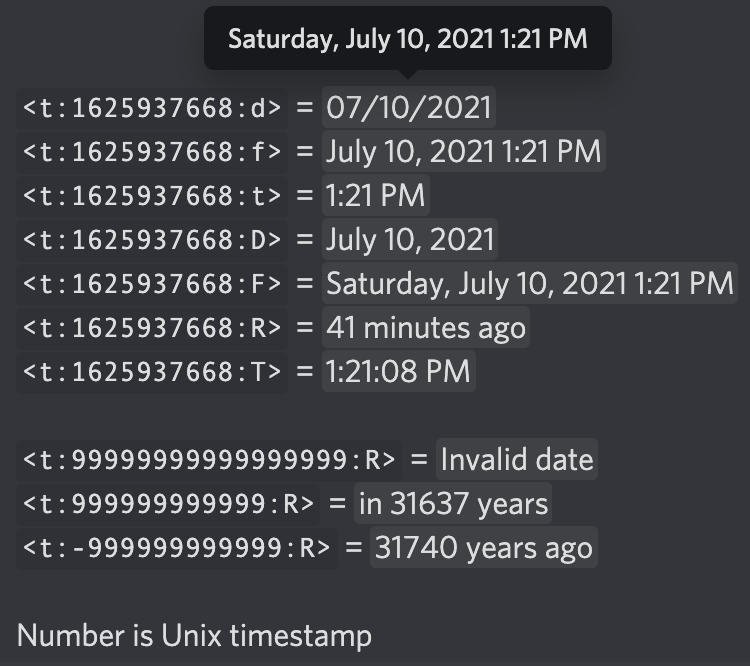
You can use various formats to choose how much information you’re showing about the linked date and time as shown in the image above. This will mostly depend on the use case, like using the suffix :R> for a countdown and :f> or :F> for an event that starts around a certain time.
Embeds
Discord is able to embed information by pulling the image, title, description and/or author from a URL. While this can be fine most of the time, there are moments when you don’t want embedded information to show up.
To prevent embeds from happening, you have two options. For singular links, the easiest way to prevent embedding is by enclosing the link with angle brackets, like this: <link> (or [Link text](<link>) for masked links). If you have multiple links in your message and you want to get rid of all embeds you can simply click the "X" of any embed that is at the bottom of your message:
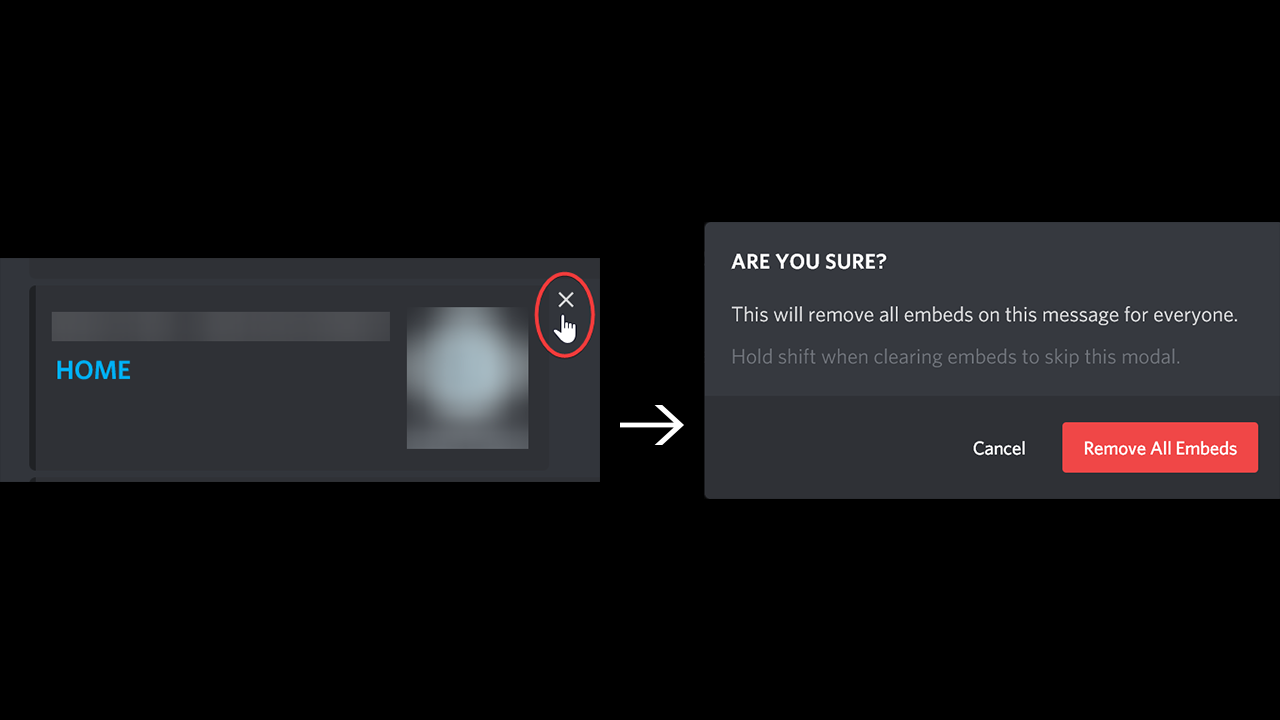
If you want specific embeds to go through, your only option is to use the brackets for the links you don’t want to appear. Social media posts, marketplace links and videos should be embedded as it increases interaction. People can view the embedded post without having to go away from Discord, making conversations easier.
Hyperlinks
Another recent addition is the ability to create hyperlinks. By using brackets and parentheses you have the ability to mask links. This is not only great for cleaning up links, but also a perfect tool to shorten long links for the reader. You can still manually disable embed cards by using the angle brackets [Link text](<link>) or by clicking the X that appears below the message.
Forcing line breaks
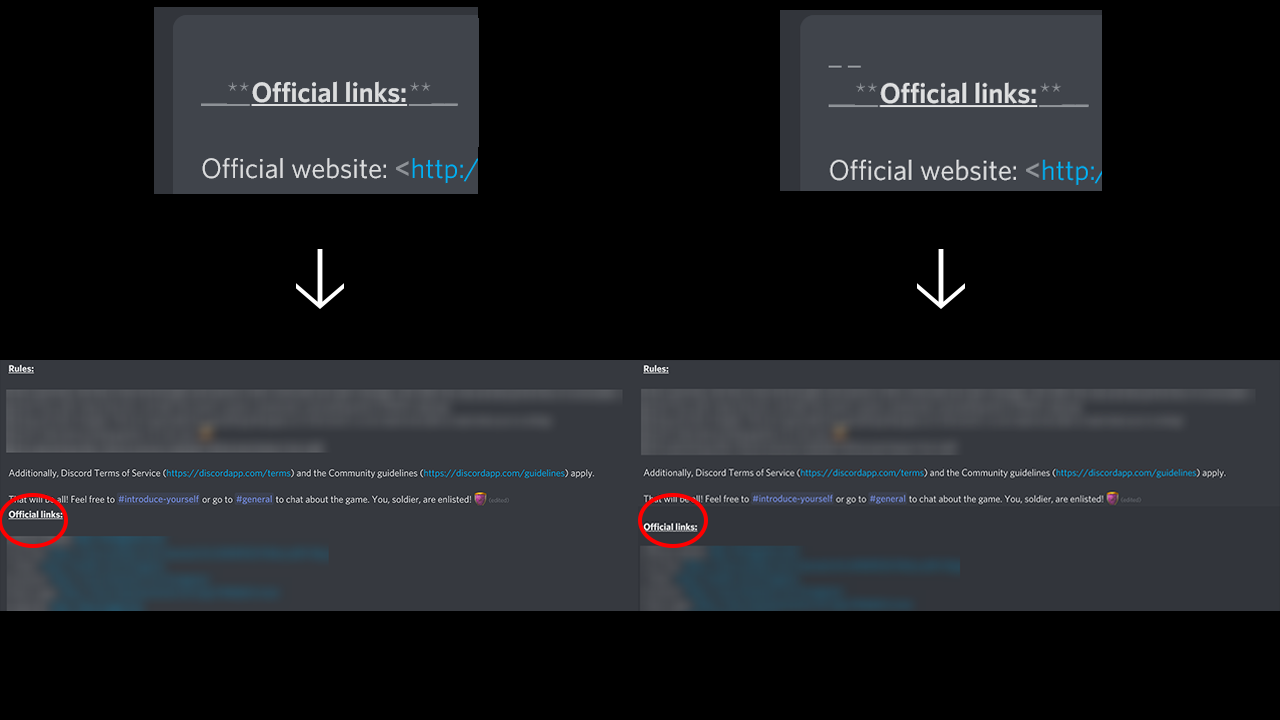
Aside from text formatting and embedding, there are various tricks you can use to increase the readability of posts that will be read often. Because of the message character limit of 2000 (or 4000 with Nitro), it often is impossible to include everything in one single post in a read-only channel. But when posting multiple messages in a row or adding images between posts, you will find that separate messages have no line breaks between them, reducing the readability of a very important channel. You can't start a new post with a line break either, as Discord automatically removes those.
Luckily, there’s a simple workaround: force Markdown on a space ( ) by using underscores or asterisks (_ _ or * *). This forces Discord to render the space in italics even though it literally is just a space, and recognise it as a full line. See the image below to compare:
Using emoji
Next to conveying emotions and reactions with emoji, you can also use them for formatting purposes. You can have them be the bullet points of lists, icons for links or use them to put emphasis on certain words. Another helpful tool is to create an invisible emoji to resemble indentation. While we now have bulleted lists with one level of indentation, it might not prove enough if you want to build more sophisticated lists. Simply create a transparent image (128x128px is the basic canvas for emoji, I opted for 128x32px) that resembles the size of an indent and upload it as an emoji to use it with your post:
 👈 see the indent over here?
💡 Tip
Uploading formative emoji to your server will allow other users to use it too. With a Discord Nitro subscription you could opt to upload them to a private server, if you are more comfortable with that.
Using pins and @mentions
Pinning a message was an effective way to store information that is referenced often. Now with Onboarding, you can build resource pages for everyone to easily browse without having to manage pins. This makes pinning messages more applicable when the message refers to the channel the message is pinned in.
Where to pin messages
When you have channels for bug reports or feedback, it is quite useful to pin reminders that help users get started. A post explaining how to format a bug report or search for log files is a good example of information that you want accessible for everyone in high traffic channels.
If your post is in a read-only channel there is no need to pin it, especially if it's the only post in that channel. No further chat will ever remove those message(s) from view, so pinning that only adds nothing but clutter. Speaking of clutter: you can delete the pin notification message (saying "... pinned a message to this channel. See all the pins.") like any other message. If you really want to pin a message that users won’t be able to scroll past, at least remove the notification from the channel to keep it looking clean.
Lastly, I want to emphasize that as with many other aspects of Discord, less is more. For pins not to lose any meaning, use them sparingly as little nuggets of knowledge you can direct traffic to and your users can rely on. Additionally, nobody wants to read through twenty pins in a channel to figure out what they need to do or be reminded of. Consider creating a resource page with the Onboarding functionality. Be sure to regularly take a few minutes to check your pins to see if they are still relevant as well. Most of the times, they are very time-specific and could be outdated information.
When to use @everyone and @here
The @everyone mention should not be used lightly as a lot of notifications might provoke members to mute or even leave the server. I recommend to only use @everyone in messages that are relevant to the game or Discord community, and are of high importance. Even when members have muted the server suppressing notifications, this is the only @mention that will give them a red notification icon.
Bear in mind it’s very hard to get members to unmute your server if they decided it was too much. Try to assign roles based on notification interests and @mention those instead. This is beneficial to both of you: members are in control of what news they are subscribed to and you will be get insights on what people are interested in as well.
As for @here, it only pings online users that don't have any idle status. This is helpful if you need anyone's attention about something happening right now but will probably end in the near future, like a server outage or taking questions after a live presentation. Bear in mind that people who log in the day after still see the red notification, so if it's no longer relevant be sure to communicate that part, too.
💡 Tip
If you want to link the role mention so bots and other pages on your Discord server can use it too, write the @mention like this: <@&RoleID>. For the Role ID go to the Roles setting of your server and right-click on the role that you want to @mention and select “Copy ID”. You can also do this for channels by writing <#ChannelID>. This makes hard-linking channels possible in embedded messages, too.
This guide is for moderators and any administrators who moderate chat. In this section I will provide information about Discord’s native Automod, show some tips and features to make your life as a mod easier, and list some attitude goals to be an effective moderator and potentially step up to be an admin. Whether you do this for family, a friend, a complete stranger, paid or voluntarily: thank you for keeping Discord servers a safe place for everyone to feel at home!
Auto-moderation
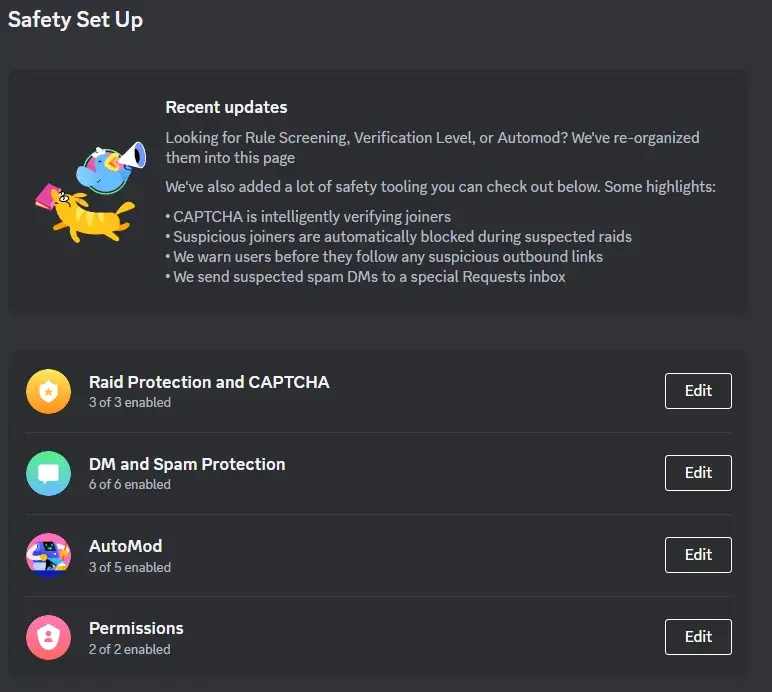
To make moderating a server as easy as possible, there are several settings and methods to implement that will save yourself a lot of time. While auto-moderation via a Discord bot is not necessarily something of the past, this section will only cover the Automod settings that are natively supported. If you aren’t an admin yourself, ask for the server admin to implement these features to help safeguard the community and yourself.
Raid protection
This will help if the server is joined by a lot of accounts in a short amount of time as it will prompt users for a CAPTCHA. The additional activity alerts can help you monitor unusual DM activity to help protect members.
DM and spam protection
These settings refer to the verification level, rules screen and the privacy of the server members. It’s recommended to mirror the rules screen of Onboarding if this is enabled.
Automod
Automod has only been possible with bots until recently. This feature allows for deleting messages before they are sent, meaning no more unread messages icon anymore after cleaning up spam or abusive content. I recommend everything being enabled except custom words, as that will probably be configured based on how your community grows.
Permissions
This will already be activated if Community has been enabled. These settings require users with moderator roles to have 2FA set up and removes any risky permissions from @everyone.
Mod tools
Logging channels
Together with the automatic filters of Automod, one or more logging channels will be extremely helpful to keep track of user and moderator actions. If you’ve set up flags with the Automod rules, you likely already have a logging channel. Adding tracking user joins, leaves, edited messages, deleted messages and bans is recommended to ensure you can catch users that manipulate messages to break the rules. For example, when someone tries to spam slurs in chat but is stopped by the Automod filter you might want to ban them afterwards, depending on the severity of the messages.
If you need a bot for logging purposes, you can find recommendations in a later guide. It’s beneficial to use a bot that will include the user ID so you can always track users to follow up, even when they leave the server. Deploying a logging channel is a crucial part of staying in the loop and keeping track of what happens in the server.
Copying IDs from users, messages and channels
Before you can copy IDs, you will need to activate Developer Mode. Find this under ‘Advanced’ in your app settings on PC as well as mobile. Now you can copy IDs of messages, users, channels and roles by right clicking or long pressing the content and selecting ‘Copy ID’. This will help to successfully identify, report and/or ban users that are not in the server anymore. You can also copy a message link which can be helpful to post if you need to direct traffic to a specific message. To retrieve the message link, right click the message and press “Copy Message Link”. On mobile, tap and hold on the message and press “Share”.
💡 Tip
Next to copying IDs for moderation purposes, you can copy role IDs to mention them directly like this:
<@&roleID>. This is useful for mentioning the roles anywhere that’s not a message or through an embedded message, like with a bot. Aside from role IDs you can also do this with channel IDs, although this is generally limited to linking in Event descriptions and channel topics.
Removing reactions
You can remove both all and individual reactions from a post if the situation warrants it, like emoji that break the server rules. Simply right click the message and find “Remove Reactions” to remove all of an individual reaction, or "Remove All Reactions" to purge all emoji reactions from the post. If you would like to remove an individual reaction emoji by a user, click “View Reactions” instead to view the entire list categorised by emoji. Simply click on the X that appears on the right side when hovering over a user to remove it.
💡 Tip
Admins can prevent users from posting reaction emoji by going to the channel or role permissions, and finding the ‘Add Reactions’ toggle. Bear in mind that users will always be able to add to existing emoji added by other users that are allowed to do so.
Members Page
The members page is a recent feature that gives you an overview of all the members including account age, server join age, the invite link they used, role they are assigned and potential flags. The flags are currently limited to timed out users and unusual DM activity. For timed out users, it will show how long is left until the user isn’t muted anymore. Unfortunately, you can not see the reason added by the admin or mod that timed out the user.

The unusual DM activity is more of a mystery, but this is by design as sharing any hard limits would open it up to abuse. When a member has sent an unusual amount of DMs (compared to your server’s average) to users who aren’t friends in the last 24 hours, the user will get flagged. Bear in mind it’s just a flag; you will still need to take action or talk to the user to find out whether they are truly spamming people. To see this channel you need to have permissions to manage users, and kick/ban them, or have administrator permissions.
Moderator Goals
Being a moderator can mean different things from server to server. In this section I will cover some goals that will help you approach any type of moderation with the right attitude.
Internal Relations
A hidden moderator channel will need to be created to provide a space for alerting other moderators about mod activities or discussing user activity. Ideally this channel is separated from the logging channel, to keep moderator discussions clear of Automod flags and bot logs. Especially on servers that are globally active, even just keeping each other in the loop is helpful to determine follow-up actions.
It can also act as a bridge between administrator and moderators to discuss server feedback and user sentiment. Moderators can suggest adding tools or changing settings to help catch frequent rule-breaking activity, and administrators can help by pinning moderator guidelines and helpful resources, and preparing moderators for any upcoming changes to the server.
User Relations
Be friendly, humble & empathetic. Nobody likes a community member that is aggressive, doesn't allow for other people's opinion or has a giant ego. As a mod you should get along with the users in a server and take time to be friendly and empathetic to others. Remind others - through your behaviour - that even though you're a person of authority, you're still a human being with feelings.
Understand the rules of the server you moderate. Don't be a hypocrite. The rules apply for you as well, so make sure you steer your discussions within these lines. Aim to create a non-toxic environment and act swiftly on rule breakers to ensure everyone feels safe. Not everyone who feels unsafe actually speaks up, so try to be proactive when approaching rule-breakers.
Be engaging and add value. Users should be able to approach you with any concerns as moderators are usually the first people contacted when a user has a question or wants to report another user. Be sure to welcome new people to the server, answer questions and provide support with user safety and security questions. If you can't resolve a user's issue directly, direct them to the portal/person/platform that will help them further with troubleshooting so it doesn’t end there.
All this activity does mean that you will be seen a lot in chat, so make sure that you focus on quality over quantity. Don’t be too overbearing though, as not all questions and concerns are of the highest priority. Sometimes people prefer to receive recommendations they see as non-biased too, so they rather have the community answer. It can pay off to hang back a little and let the community answer then, as it generates engagement and trust between users.
Growing into an admin
If you are a moderator that wants to help admins or potentially be one, there’s a few things that might help you get some experience and grow your skill set. These activities vary in scale and user interaction to provide a few different methods in supporting other admins or working on yourself as a moderator.
Report on feedback from the community
By interacting with the community, you might stumble upon certain trends or find that people are in need of something that the server currently doesn’t offer. It can help to report on these trends and condense individual feedback to suggestions or changes for the server to the server admin(s). Bonus points if you can list some solutions as well.
Take care of small jobs
Offering to help handle things behind the scenes can be of great help to server admins, especially if they are solo team members spending their free time on their project. You can ask for bite-sized tasks that are easy to outsource, like setting up links, rules, announcements, auto messages, providing feedback on a livestream before announcing the stream publicly, etc.
Run server Events
Discord allows for various events to be hosted and provides notifications and a schedule for server members to browse. These events can be directly related to a voice or stage channel, but can also link to an external event like a livestream, release trailer or something that’s happening in the real world.
Depending on your role as a moderator, you could help organize some of these events that are related to the community, or support the admins in executing the events. You can also create an event that resembles a timeframe when something is happening, like a competition, giveaway raffle or a national holiday.
Accessibility (original credit: @ridgeracer)
This guide will cover some basics regarding accessibility. Starting with what elements to take into account for people who are visually impaired, touching on tips on how to deal with audio channels and notification sounds, and finally the use of inclusive language. Keep in mind that these are only guidelines, and shouldn't act as a strict rulebook. Pick from this what you feel is best for your server.
Keeping graphics accessible
Next to have graphics and text that is accessible to people without any visual impairments, it is important to include support for screen readers and colour filtering. You can do this by adding alt text, placing emoji more strategically, avoiding long lists and testing your server with various different colour schemes.
Make Alt Text part of your workflow
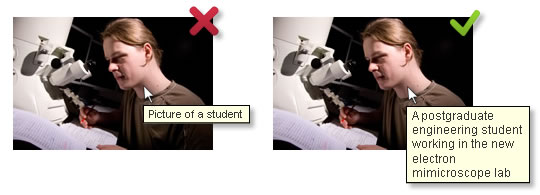
Visually impaired people can use screen readers to access Discord, and recently support for Alt Text has been added. Try to accompany every image shared with a description and keep it up to allow for visually impaired readers to get the full context of art, guides and screenshots. Try to avoid using the phrase “picture” or “photo” but feel free to be specific about the type like “screenshot” or “brand art”.
Emoji go last, not first
Things like emoji and special characters are a hassle for people that navigate using screen readers. When using emoji in things, including but not limited to categories and rules posts, consider adding these at the end of your line. So General Chat︱ 💬 instead of 💬 ︱General Chat.
Screen readers will read the emoji name as well, so by adding it to the end of the text it adds context to the text instead of text to an emoji name, if that makes sense. Meanwhile, people with sight can still visually scan the server for the emoji assigned to a certain channel or category.
Avoid bulking up read-only content
It’s extremely helpful to post rules and other lists in separate messages for people with screen readers. If your lists are in one single post, it's would force users to listen to the entire post in one go. Breaking them up into separate messages will let screen readers scroll through lists line by line. By designating these channels Resource Pages through the Onboarding setup you can remove the formatting that makes separate messages look less visually pleasing on mobile devices. On PC separate messages will look fine. If this is not an option for the channel in question, keep in mind it’s not your fault that Discord does not have proper screen reader accessibility.
Compatibility with themes and filters
When you're setting up colours for roles it’s good practice to make sure they're visible on light, dark, and the (experimental) AMOLED theme. You can find the experimental AMOLED dark theme by tapping “Dark Theme” a few times in the app’s appearance settings. Browse your server with it to see if everything is still clear. You can go a step further by testing them against various colour filters as well, that represent the perspective of users with a colour vision deficiency (CVD).

In Windows 10/11, go to the accessibility settings to find colour filters in the accessibility options. By toggling these you can test what people with colour vision deficiency see to check whether the server is still accessible. On Android, it’s hidden in de Developer Options under “Simulate colour space” and on iOS it’s under Accessibility > Display & Text Size > Color Filters.
Audio & Notifications
Contrary to visual elements, sounds and notifications are a lot harder to grasp. Trying to envision what other users can experience might be difficult. The key is to be aware of how sound can be different for everyone.
Use pings sparingly
Since Discord unfathomably has no support for custom sounds, the ping sound can be a pain or at best a nuisance for some people. Consider setting up assignable roles to let people opt in to the notifications they want to receive. This will help them control the frequency and potential urgency to act on the ping.
Force push-to-talk and set expectations
Consider having voice channels where people are forced to use push to talk to lessen the amount of simultaneous noise. There can be a lot of background noises that add up to the experience. In the same way, music bots can be fun but you should designate what channels are for the music bot so users know what to expect. Music requests can get overwhelming for people who are hard of hearing (HoH), or people with Auditory Processing Disorder (APD).
Accessibility through inclusivity
Inclusiveness lets a wider range of people feel welcome in your community. It is very important for members to be able to feel connected and valued, and you can directly impact that with your messaging and announcements. Allow users to specify pronouns
Currently Discord has support for setting op pronouns but not every user has access yet. Setting up roles through your Onboarding post-join questions for users to display their pronouns is a great way to avoid any awkward situations, and is more welcoming.
Avoid specific gender identities until specified
Avoid saying he/she, and use singular they instead to be inclusive of all gender identities.
Avoid If he/she hasn't…, and instead use If they haven't….
Explicitly ban the usage of abusive terms
You might think it's a no-brainer, but a surprising amount of servers don't do this from the get-go. If you explicitly make a rule against this can actually help a lot people feel safer. Things that should be banned are the obvious culprits like racism, ableism, homophobia and such. Otherwise, listen to your community, don't dismiss someone who brings up something in your server that made them feel uncomfortable, and try to see it from their point of view. Discuss what action should be taken with your admins and moderators instead of waiting for it to escalate. Users will not always speak out and might just leave silently, so be aware of what’s going on in the server as well and act swiftly. The longer you let slurs and ableism exist on your server, the less appealing it becomes for everyone.
